Saturday, July 28, 2012

PGP Signed and Encryption BizTalk pipeline components

Enhanced PGP Pipeline component to Sign and Encrypt files.

image

Properties Explained:

ASCIIArmorFlag – Writes out file in ASCII or Binary

Extension – Final File’s extension

Operation – Decrypt, Encrypt, and now SignEncrypt

Passphrase – Private Key’s password for decrypting and signing

PrivateKeyFile – Absolute path to private key file (.ASC)

PublicKeyFile – Absolute path to public key file (.ASC).


TempDirectory – Temporary directory used for file processing.

Email me if you could use this.

Sunday, May 27, 2012

OAGIS and BizTalk walk through (PurchaseOrder) - Part 2

Business Solution


We are receiving a ProcessPurchaseOrder BOD from a partner. The incoming message is received from a file location and passed into the BizTalk messaging engine, which activates a new orchestration to process this message. The orchestration will inspect the value of the ConfirmationCode element to determine the circumstances in which a ConfirmBOD message should be sent. A map will be used to generate an AcknowledgePurchaseOrder and ConfirmBOD (if needed,) message. The orchestration will then send the message(s) to the trade partner, using the value of the LogicalID node as the address of the send port.

Create Ports

File location of the incoming ProcessPurchaseOrder document.
c:\oagis\in
File location that the outbound AcknolwedgePurchaseOrder and ConfirmBOD documents will be created in.
c:\oagis\out
Assembly containing Component schemas required for Nouns.
Components_Schemas.dll
Assembly containing the BOD and PurchaseOrder Nouns.
Noun_Schemas.dll
Assembly containing AcknowledgePurchaseOrder, ConfirmBOD and ProcessPurchaseOrder BOD schemas.
BOD_Schemas.dll

Create the Maps

The AcknolwedgePurchaseOrder and ConfirmBOD documents will be generated by applying a map to the ProcessPurchaseOrder document. The map will copy elements of the ProcessPurchaseOrder message into the response messages so that the originating system will be able to match the response documents to the original ProcessPurchaseOrder request.

Create the AcknowledgePurchaseOrder map

In Visual Studio 2010, create a new BizTalk project named “Maps.” This will contain the BizTalk maps used to create the AcknowledgePurchaseOrder and ConfirmBOD messages.

In Solution Explorer, right-click the project name, and select Add Reference. On the Browse tab, select the Components_Schemsa.dll, Noun_Schemas.dll and Bod_Schemas.dll assemblies, and then click OK. These references will allow the maps to access the BOD schemas.

Right-click the project name and select Properties. On the Project Property Pages, expand the Common Properties entry, select Assembly, and then select the Assembly Key File entry in the right pane. Click the ellipsis (…) button, and then select the OAGIS.snk file created previously. Click OK.
Right-click the project name, select Add, and then select New Item. On the Add New Item dialog box, select Map files in the Categories pane, then select Map in the Templates pane. Enter “POToAck.btm” in the Name field, and then click OK.

Click Open Source Schema. In the BizTalk Type Picker section, expand Maps, expand References, and expand the reference containing the BOD schemas.

Expand Schemas, and then select the ProcessPurchaseOrder schema. Click OK. Repeat this step to select AcknowledgePurchaseOrder as the Destination Schema.


From the Toolbox, drag the items to the grid between the two schemas: String Concatenate, Date and Time, Scripting, Mass Copy (add this item twice).

Set the following parameters for the String Concatenate and Scripting Functoids:
String Concatenate. Select the String Concatenate item from the grid.

In Properties, select Input Parameters, and then click the ellipsis (…) button.
Click the Insert New Parameter button and enter the value “9.5” for the new parameter. Click OK.
Select the Scripting item from the grid. In Properties, select Script, and then click the ellipsis (…) button.

Select Inline C# from the Script type drop-down list, enter the following in the Inline Script Buffer, and then click OK.

This code will return a new GUID value that will be used to populate the BODID element of the outbound document.
public string GetGuid()
{
   return System.Guid.NewGuid().ToString();
}
Link the following items by dragging lines between them:


Source schema node
Functoid
Destination schema node
No incoming link
String Concatenate
AcknowledgePurchaseOrder\releaseID
No incoming link
Date and Time
AcknowledgePurchaseOrder\<Sequence>\ApplicationArea\CreationDateTime
No incoming link
Scripting
AcknowledgePurchaseOrder\<Sequence>\ApplicationArea\BODID
ProcessPurchaseOrder\<Sequence>\ApplicationArea
Mass Copy
AcknowledgePurchaseOrder\<Sequence>\DataArea\Acknowledge
\<Sequence>\OriginalApplicationArea
ProcessPurchaseOrder\<Sequence>\DataArea\PurchaseOrder
Mass Copy
AcknowledgePurchaseOrder\<Sequence>\DataArea\PurchaseOrder

In Solution Explorer, right-click the project name and select Build. After successful Deploy.

Create the ConfirmBOD map

In Visual Studio 2010, open the BizTalk project containing the AcknowledgePurchaseOrder map.
Right-click the project name, select Add, and then select New Item. On the Add New Item dialog box, select Map files in the Categories pane, and then select Map in the Templates pane. Enter “POToConfirm.btm” in the Name field, and then click OK.

Click Open Source Schema. In the BizTalk Type Picker, expand Maps, expand References, and then expand the reference containing the BOD schemas.

Expand Schemas, select the ProcessPurchaseOrder schema, and then click OK.

Repeat this step to select ConfirmBOD as the Destination Schema.

From the Toolbox, drag the items to the grid between the two schemas: Concatenate, String Concatenate, Date and Time, Scripting,  Mass Copy (add this item twice)

Set the following parameters for the String Concatenate and Scripting Functoids:

String Concatenate
Select the String Concatenate item from the grid. In Properties, select Input Parameters and click the ellipsis (…) button.
Click the Insert New Parameter button and enter the value “9.2” for the new parameter. Click OK.

Scripting Functoid
Select the Scripting item from the grid. In Properties, select Script, and then click the ellipsis (…) button.

Select Inline C# from the Script type drop-down list, enter the following in the Inline Script Buffer, and then click OK.

This code will return a new GUID value that will be used to populate the BODID element of the outbound document.

public string GetGuid()
{
   return System.Guid.NewGuid().ToString();
}


Source schema node
Functoid
Destination schema node
No incoming link
String Concatenate
ConfirmBOD\releaseID
No incoming link
Date and Time
ConfirmBOD\<Sequence>\ApplicationArea\CreationDateTime
No incoming link
Scripting
ConfirmBOD\<Sequence>\ApplicationArea\BODID
ProcessPurchaseOrder\<Sequence>\ApplicationArea
Mass Copy
ConfirmBOD\<Sequence>\DataArea\Confirm
\<Sequence>\OriginalApplicationArea
ProcessPurchaseOrder\<Sequence>\DataArea\PurchaseOrder
\PurchaseOrderHeader\<Sequence>\<Group:DocumentIDsGroup>
\DocumentID\<Equivalent>\<DocumentIDType>\<Sequenece>\ID
Mass Copy
Confirm\<Sequence>\DataArea\BOD\BODSuccessMessage
\NounSuccessMessage\ProcessMessage\ID

In Solution Explorer, right-click the project name and select Build. After successful Deploy.

Create the Orchestration

Orchestrations typically contain processing logic, such as what action to take if a document contains a certain value. In this scenario, we will inspect the value of ConfirmationCode on the ProcessPurchaseOrder request, and if set to “Always,” return a ConfirmBOD. The process of constructing the ConfirmBOD, as well as the AcknowledgePurchaseOrder documents, will be handled by maps located in send ports.

In Visual Studio 2010, create a new BizTalk project to contain the orchestration.
In Solution Explorer, right-click the project name and select Add Reference.  On the Browse tab, select the assemblies containing the BOD, Noun and Component schemas, and then click OK.

Right-click the project name and select properties. In the Project Property Pages, expand the Common Properties entry, select Assembly, and then select the Assembly Key File entry in the right pane. Click the ellipsis (…) button and select the OAGIS.snk file created previously.

Right-click the project name, select Add, and then select New Item. On the Add New Item dialog box, select Orchestration files in the Categories pane, then select BizTalk Orchestration in the Templates pane. Enter “ProcessPO.odx” in the Name field, and then click OK.

Right-click Port Surface, and select New Configured Port. Click Next and enter Receive_Port in the Name field. Continue through the wizard, selecting Next to accept the default values, and then click Finish.

Configure the Send_Ack_Port and Send_Confirm_Port:
- Right-click the Port Surface and select New Configured Port. Click Next and enter “Send_Ack_Port” in the Name field. Click Next.

- Accept the defaults on the Select a Port Type page by clicking Next. On the Port Binding page, set the Port direction of communication field to I’ll always be sending messages on this port, and then set the Port Binding to Dynamic.

- Set the Send pipeline field to Microsoft.BizTalk.DefaultPipelines.XMLTransmit, and then click Next. Click Finish.

Repeat this step to create the Send_Confirm_Port.

In Orchestration View, right-click Messages, and then select New Message. In Properties, enter “PO_In” in the Identifier field. From the Message Type drop-down list, expand Schemas, and then click <Select from reference>.

On the Select Artifact Type dialog box, expand the reference containing the BOD schemas, and select the ProcessPurchaseOrder schema. Click OK.


Add and configure the following action shapes to design the orchestration flow:
ProcessPurchaseOrder Receive

From the Toolbox, drag the Receive shape to the design surface and drop it on the Drop a shape from the toolbox here text. In Properties, enter “Receive_PO” in the Name field and select PO_In as the value of the Message field. Set the value of the Activate field to True to indicate that messages received in this shape should create a new instance of the orchestration.

Confirmation Decision
- From the Toolbox, drag the Decide shape to the design surface and place it immediately below the Receive_PO shape. In Properties, set the Name of the Decide shape to “Send_Confirm.”

- Select the Rule_1 branch of the decide shape, and in Properties, set the Name field to Always. Select the Expression field and click the ellipsis (…) button.

- In the BizTalk Expression Editor, enter the following code, and then click OK:
PO_In(BOD_Schemas.PropertySchema.ConfirmationCode)=="Always"

If the Confirmation Code of the incoming message contains the value “Always,” then this branch of the Decide shape will be processed.
ConfirmBOD Send
Add an Expression shape immediately after the Always shape in the Send_Confirm decision. In Properties, enter Set_Confirm_Address in the Name field. Select the Expression field, and then click the ellipsis (…) button.

In the BizTalk Expression Editor, enter the following:
Send_Confirm_Port(Microsoft.XLANGs.BaseTypes.Address)=PO_In(BOD_Schemas.PropertySchema.LogicalID)+”Confirm.xml”;
This will set the Send_Confirm port to the address contained in the LogicalID field of the incoming message, and a message name of Confirm.xml. This will be the URI used to send the message returned over this port.

From the Toolbox, drag the Send shape to the design surface and place it immediately after the Set_Confirm_Address, inside the Send_Confirm Decide shape. This will be used to send the ConfirmBOD message if the Always rule is triggered. In Properties, set the Name of the Send shape to Send_Confirm. Set the Message to PO_In.
AcknowledgePurchaseOrder Send
Add an Expression shape immediately after the Send_Confirm decision shape. In Properties, set the Name field to Set_Ack_Address, select the Expression field, and then click the ellipsis (…) button.
In the BizTalk Expression Editor, enter the following code:
Send_ACK_Port(Microsoft.XLANGs.BaseTypes.Address)=PO_In(BOD_Schemas.PropertySchema.LogicalID)+”Ack.xml”;
This will set the Send_Confirm port to the address contained in the LogicalID field of the incoming message, with a message name of Ack.xml. This will be the URI used to send the message returned over this port.

From the Toolbox, drag the Send shape to the design surface and place it immediately after the Send_Confirm design shape. This should place it immediately above the red stop symbol. In Properties, set the Name to “Send_Ack” and set the Message to “PO_In.” This port will send the AcknowledgePurchaseOrder message to your trade partner.

To link the Send and Receive shapes to the logical ports, drag the green direction indicator of the port shapes to the Send and Receive shapes:


Drag this
To this
Receive_Port
Receive_PO
Send_Ack_Port
Send_Ack
Send_Confirm_Port
Send_Confirm


In Solution Explorer, right-click the project name and select Build. After successful Deploy.

Create the Messaging Ports

The logical ports in the orchestration will be connected to physical messaging ports. In the following steps you will use the BizTalk Administration Console to create and configure the following ports:


Port Name
Purpose
Receive_PO
Receives the ProcessPurchaseOrder request.
Send_ACK
Sends the AcknowledgePurchaseOrder response.
Send_Confirm
Sends the ConfirmBOD, if requested by the ProcessPurchaseOrder request.

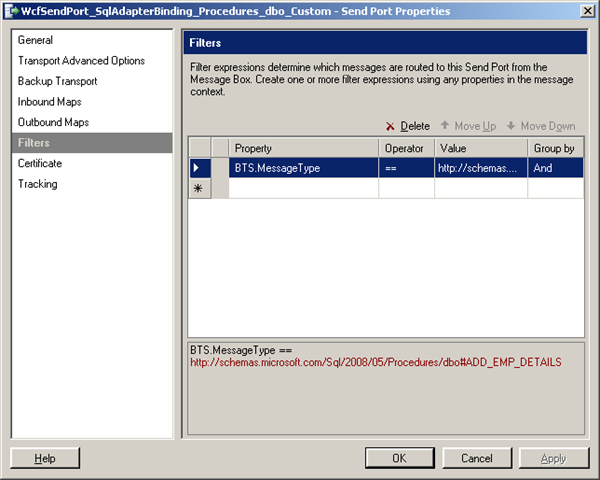
Right-click the send port containing “Send_Confirm_Port” as part of the name, and then select Properties. Select POconfirm map as outbound.


In the Bindings section, select Receive_PO in the Receive Ports field to associate the logical Receive_Port in the orchestration with the Receive_PO message port. Note that the Outbound Logical Ports are already selected. Click OK.


Right-click the orchestration, and then select Start.

At this point the orchestration and ports should be enabled, and ready to process incoming messages.

BizTalk Server will pick up incoming documents from c:\oagis\in, process them, and send the AcknowledgePurchaseOrder, and optionally ConfirmBOD documents. The value of the LogicalId field will be used as the output path for the response documents. In this scenario it should contain the value “file://c:\oagis\out\”.

OAGIS and BizTalk - Extend BOD

Extend OAGIS schema

.....coming up very soon

OAGIS and BizTalk walk through (PurchaseOrder) - Part 1

OAGIS and BizTalk walk through using AcknowledgePurchaseOrder, ConfirmBOD and ProcessPurchaseOrder Business Object Documents


About OAGIS

OAGIS is the common content model needed to represent messages that enable communication between business applications, whether the messages are application-to-application (A2A), business-to-business (B2B), or vertical industry- to-vertical industry (V2V) in nature. In short, OAGIS enables everywhere-to-everywhere integration.


OAGIS provides a common data model that provides a common basis of understanding, allowing all the applications involved in the information exchange to understand the intent of the message. The messaging specifications are analogous to the envelope. The integration engine used to transport and route the message is analogous to the postal service. The message and message format are analogous to OAGIS, which enables the understanding of the information on each end.

Understand OAGIS Schema and XML design

The common XML message structure provided by OAGIS is the Business Object Document (BOD,) which provides a message architecture based on the following reusable components:

Nouns - Nouns describe a common business object and are composed of Components, which are basic building blocks shared across all Nouns.

Verbs - Verbs describe the action to be applied to the Noun.

For example, the ProcessPurchaseOrder BOD is constructed from the PurchaseOrder Noun and the Process Verb. All BOD messages are based on common Nouns combined with a Verb.
During a document’s lifecycle, the Noun may be combined with various Verbs to achieve portions of a business process. You may send your partner a ProcessPurchaseOrder, the partner responds with an AcknowledgePurchaseOrder and you later may need to issue a ChangePurchaseOrder. All three messages would use the same Noun to describe the Purchase Order.
Additionally, all BODs contain an application area with information that can be used by the processing infrastructure for routing, authorization and receipt verification. 


Implementing BODs with BizTalk Server

Because OAGIS BODs are native XSD based schemas, you can directly use them within BizTalk projects with only minor modifications to the schemas. BizTalk projects are compiled into .NET assemblies during which the XSD schemas are compiled into classes. Due to this compilation of the schemas, the following changes must be made:

XSD Include and Import statements must be changed from file path to assembly reference when referencing schemas in a separate assembly.
Set the Root Reference property for Noun and BOD schemas to reduce the number of .NET classes created during compilation. This also determines which node the BizTalk Mapper will use as the document root

Creating Schema Projects

The recommended method of using BODs within BizTalk projects is to separate the Components into one project, Nouns into another project, and BODs into one or more projects. This modular approach mirrors the architecture of OAGIS and also reduces the number of items that need to be built and deployed when a new Noun or BOD needs to be implemented. The following steps demonstrate how to create BizTalk projects to implement OAGIS schemas within BizTalk Server:

Create Component Project

Download and extract the OAGIS schemas from http://www.oagi.org/. This archive contains the OAGIS schemas that will be used in the BizTalk projects. These steps are based on OAGIS Release 9.4. Similar steps can be used for other OAGIS releases.

In Microsoft Visual Studio 2010, create a new BizTalk project named “Component_Schemas.” This schema will contain the OAGIS Component schemas.

In Windows Explorer, navigate to the OAGIS schemas and find the Components folder. Copy the contents of this folder to your BizTalk project directory.

In Solution Explorer, select Show All Files. This should display the files and folders copied from the OAGIS Components folder.

Select each of the Component files and folders, and then right-click Include In Project. Deselect Show All Files to hide files not included in the project.

Add strong key to Project, build and Deploy.

Create Noun Project

In Microsoft Visual Studio 2010, create a new BizTalk project named “Noun_Schemas.”
In Solution Explorer, right-click the project name and select Add Reference. Select the Browse tab, browse to the Component_Schemas.dll assembly, and then click OK.

Right-click the project name, select Add, and then select Existing Item. Browse to and select the OAGIS Nouns: PurchaseOrder.xsd, BOD.xsd.

In Solution Explorer, double-click BOD.xsd. Click OK on the dialog box stating that this is an invalid XSD Schema. The BOD.xsd schema should appear. The schema is initially invalid as it contains XSD include statements that reference non-existent files. The following steps will modify the schema to use assembly references to resolve this error.

In the BOD.xsd schema, select the <Schema> node and then select Imports field, click the ellipsis (…) button.


In the Imports dialog box, find the rows that have XSD Include in the Import Type column. For these rows, note the file name specified in the Location column.

In the Import new schema as drop-down list, select XSD Include, and then click Add.

In the BizTalk Type Picker dialog box, expand the Project name, and then expand References. Expand the assembly reference that contains the Component schemas, expand the Schemas entry and then select the schema that matches the current XSD Include. Click OK.


There should now be two XSD Includes for each included Components schema: one with a file path in the Location column and a second with an assembly reference. Select the entries that contain a file location and click the X button to remove this entry. After all rows containing file locations have been removed, click OK.

Select the Root Reference field and in the drop-down list, select the entry that matches the Noun. For example, if the Noun schema is BOD, select the BOD entry.

Repeat the above steps for the PurchaseOrder schema.

Add strong key and deploy the Project.

Create BOD project

In Microsoft Visual Studio 2010, create a new BizTalk project named “BOD_Schemas.”

In Solution Explorer, right-click the project name and select Add Reference. Select the Browse tab and browse and select the Noun_Schemas.dll and Component_Schemas.dll assemblies. Click OK.
Right-click the project name, select Add, and then select Existing Item. Browse and select the OAGIS BODs: ConfirmBOD.xsd, AcknowledgePurchaseOrder.xsd, ProcessPurchaseOrder.xsd

In Solution Explorer, double-click AcknowledgePurchaseOrder.xsd. Click OK on the dialog box stating that this is an invalid XSD Schema, and the AcknowledgePurchaseOrder.xsd schema should appear.

In the AcknowledgePurchaseOrder.xsd schema, select the <Schema> node and perform the following steps in Properties:

- Select the Imports field, and then click the ellipsis (…) button.

- In the Imports dialog box, find the rows that have XSD Include in the Import Type column. For these rows, note the file name specified in the Location column.

- In the Import new schema as drop-down list, select XSD Include, and then click Add.

- In the BizTalk Type Picker dialog box, expand <Project name> and then expand References. Expand the assembly reference that contains the Noun schemas, expand the Schemas entry, and then select the schema that matches the current XSD Include. Click OK.

- There should now be two XSD Includes for each included Components schema; one with a file path in the Location column and a second with an assembly reference. Select the entries that contain a file location and click the X button to delete this entry. After all rows containing file locations have been removed click OK.

- Select the Root Reference field, and in the drop-down list, select the entry that matches the Noun. For example, if the BOD schema is AcknowledgePurchaseOrder, select the AcknowledgePurchaseOrder entry.

Repeat the above steps for the ConfirmBOD and ProcessPurchaseOrder schemas.

The following procedures describe the process of promoting two properties within the BOD project created previously. These properties will be used in an orchestration project in a later procedure.

In Microsoft Visual Studio 2010, open the BizTalk BOD_Schemas project.

In Solution Explorer, right-click the project name, select Add, and then select New Item.
In the Add New Item dialog box, select Schema Files in the Categories pane, and then select Property Schema from the Templates pane. Click Add.

In the PropertySchema.xsd, right-click the <Schema> node and add the as Child Field Elements: ConfirmationCode, LogicalID

After adding these elements, save and close the PropertySchema.xsd.

In Solution Explorer, right-click the ProcessPurchaseOrder.xsd and select Open.

In the left pane, select and expand the ProcessPurchaseOrder node and then expand the first <Sequence> node. Expand the ApplicationArea node, and then expand the Sender node.

Right-click the ConfirmationCode node, select Promote, and then select Show Promotions.
In the Promote Properties dialog box, select the Property Fields tab, and then click the Add a new Property Schema button.


In the BizTalk Type Picker dialog box, expand the Schemas entry, and then select the PropertySchema entry. Click OK.

Highlight ConfirmationCode, and then click Add. This creates a new entry in the Property fields list.
In the Property fields list, select the property created for Confirmation code and in the drop-down list, select ns0:ConfirmationCode. This selects the appropriate entry in the PropertySchema.xsd to use for this property.

In the left pane of the Promote Properties dialog box, select the ProcessPurchaseOrder\<Sequence>\ApplicationArea\Sender\LogicalID node, and then click Add.
Ensure that the Property entry for this field is selected on ns0:LogicalID.


Click OK, and then save the ProcessPurchaseOrder.xsd.

Add strong key to Project, build and Deploy.

In Next step we will take folloing business scenario and integrate end to end.

"We are receiving a ProcessPurchaseOrder BOD from a partner. The incoming message is received from a file location and passed into the BizTalk messaging engine, which activates a new orchestration to process this message. The orchestration will inspect the value of the ConfirmationCode element to determine the circumstances in which a ConfirmBOD message should be sent. A map will be used to generate an AcknowledgePurchaseOrder and ConfirmBOD (if needed,) message. The orchestration will then send the message(s) to the trade partner, using the value of the LogicalID node as the address of the send port."

.....state tune for next post

Monday, December 19, 2011

Biztalk 2010 R2

BizTalk Server is Microsoft's integration and connectivity server and is one of the most deployed integration servers in the industry. BizTalk Server 2010 was released just over a year ago. Today we are happy to share details on what customers can expect from the next release: BizTalk Server 2010 R2.

BizTalk Server 2010 R2 will focus on three primary themes:

Platform Support – Supporting new and current server and development platforms
Improved B2B – Aligning with industry standards and continuing to invest in performance improvements
Ready for the Cloud – Enabling customers to take advantage of the benefits of cloud computing

BizTalk Server 2010 R2 will be delivered approximately 6 months following the release of Windows Server 8. Release timing for Windows Server 8 is yet to be announced and will be disclosed by the Windows Server team in the future.

In addition to the investments we are making in BizTalk Server 2010 R2, we will continue the tradition of providing regular cumulative updates on a quarterly basis. These include updates to comply with Line-Of-Business (LOB) systems, schema changes, accelerator certifications, and bug fixes.

We believe that with this release we continue to deliver a mature, reliable and stable integration server that honors the trust of the thousands of customers who run their mission critical business processes on BizTalk Server.

Below is the detailed view of the features we are releasing:

New Platforms and Infrastructure
Windows Server 8*
SQL Server 2012*

Increased Developer and IT Productivity
Visual Studio 11* and Windows 8* to develop solutions
In-place migration from BizTalk Server 2010

Extended Platform Integration

DB2 client connectivity to SQL Server,
conversion of commands to T-SQL,
migration of packages to stored procedures
Adapter connectivity to new data sources, including IBM Informix V11 and IBM IMS/DB V11

Agile Alignment to Industry Standards
Regular updates to schemas, accelerators certifications and adapters. Highlights include:
Healthcare: HIPPA 5010 extensions: 2777CA, 999, HL7 2.5.1
Finance: SWIFT SRG 2011 support, SWIFT SRG 2012, SWIFTNet 7.0 (new messaging platform)

Improved Performance and Scalability

HL7 MLLP adapter performance improvements
Better performance with ordered send ports
Enhanced scale out configuration with multiple hosts
Expanded adapter options for faster batch processing

Extend on-premises solutions to the cloud
Easily extend your on-premises BizTalk Server solution to the cloud in a secure manner
Tighter integration of on-premises BizTalk Server applications with Windows Azure Service Bus

Improved Licensing

Adjustments to licensing that are geared towards cloud hosting, including:
Purchase from a hoster on a monthly basis (SPLA)
Register your existing license with a hoster (License Mobility)

Tuesday, April 19, 2011

Insert, Update, Delete, Select operation on table in Oracle database using oracleDbBinding

Insert, Update, Delete, Select operation on table in Oracle 11g Express database using the OracleDbBinding from BizTalk Adapter pack 2010.

Create BizTalk Project and generate schema (‘s)
First, we need the XML schemas, which represent our data source. With proper installation of BizTalk Server 2010 Adapter Pack, you will have a metadata browser built into Visual Studio. NET at your disposal. Create a visual studio BizTalk project. Then you can access the metadata browser from a BizTalk project by right-clicking the project, choosing Add then Generated Items and selecting Consume Adapter Service.


Click Add. This action opens a new window that provides us the interface to connect to, browse, and select database objects for service interaction. The very first thing we need to do here is choose the oracleDBBinding as the service binding, and then configure a connection string. The simplest working connection string consists of an Initial Catalog value for the database, and a valid Server name entry.


Once a satisfactory connection string is defined, the Connect button can be clicked to establish an active connection to the target database. If the connection is successful, one see the category browser with a set of database object categories.


On the root "/" character a range of un-typed generic functions are displayed, which can be exploited. Click on tables and you will see a number of Tables, select Employee.


Click the Delete, Insert, Select and Update statement in available categories and operations. Click the Add button to add the operations.After clicking the Ok button at the bottom, schema (and a single binding file) is added to our associated BizTalk project in Visual Studio.NET.


The binding can be used later, when solution is deployed and ports have to be configured for Oracle 11g Express (i.e. Send Port).

Create message instances
Next step is to generate messages from generated schema, which can be routed from Recieve location in Receive Port to a send port with WCF-OracleDb Adapter (messaging based solution). Generating the messages is easy, by opening first OracleDBBindingHR.Table.EMPLOYEES.xsd in file-editor you can move the desired operation to top, so you can then in Visual Studio generate the next instance for an operation or you can use XML-Editor inside Visual Studio (closing schema, right click and select open with… and then select XML Editor) to move elements around. In end you will have four xml instance for TableOperations, save to file as xml (type all files, encoding UTF-8!).

Update


Insert


Delete


Build and deploy the BizTalk project
Only schemas are required for a messaging only scenario with WCF-Oracle Adapter to perform operations on Oracle database. Therefore after assigning a strong name and application name to BizTalk project it can be build and deployed.

Configure the application
After solution has been deployed it is time to configure the ports. FILE ports are easy and focus here will be configuring the WCF-Oracle Send Port. Through BizTalk Management Console one can browse to OracleTableOperations application and right click the application and select Import Bindings … and navigate to file called WcfSendPort_OracleDBBinding_Custom.bindinginfo.xml, select and click Open. You will notice that a Send Port will be created automatically.


If you look at created send port and configuration you will notice that everything is there. Although having all operations in one action mapping is not going to work. If you try to send message with select statement to BizTalk you will get following error:

The adapter failed to transmit message going to send port "WcfSendPort_OracleDBBinding_HR_Table_EMPLOYEES_Custom" with URL "oracledb://win-8bpntqktj5m:1521/XE/Dedicated". It will be retransmitted after the retry interval specified for this Send Port. Details:"System.InvalidOperationException: An action mapping was defined but BTS.Operation was not found in the message context.

Port RecvPortOracleOpsIn
Type File
Filter - None

Port SendPortOracleOpsOut
Type File
Filter - BTS.MessageType == http://Microsoft.LobServices.OracleDB/2007/03/HR/Table/EMPLOYEES#SelectResponse
OR
Filter - BTS.MessageType == http://Microsoft.LobServices.OracleDB/2007/03/HR/Table/EMPLOYEES#InsertResponse
OR
Filter - BTS.MessageType == http://Microsoft.LobServices.OracleDB/2007/03/HR/Table/EMPLOYEES#UpdateResponse
OR
Filter - BTS.MessageType == http://Microsoft.LobServices.OracleDB/2007/03/HR/Table/EMPLOYEES#DeleteResponse

Port RecvPortOracleOpsIn
Type WCF-Custom
Filter - BTS.MessageType == http://Microsoft.LobServices.OracleDB/2007/03/HR/Table/EMPLOYEES#Select

Port WCFSndPort_OracleDBBinding_HR_TABLE_INSERT
Type WCF-Custom
Filter - BTS.MessageType == http://Microsoft.LobServices.OracleDB/2007/03/HR/Table/EMPLOYEES#Insert

Port WCFSndPort_OracleDBBinding_HR_TABLE_INSERT
Type WCF-Custom
Filter - BTS.MessageType == http://Microsoft.LobServices.OracleDB/2007/03/HR/Table/EMPLOYEES#Update

Port WCFSndPort_OracleDBBinding_HR_TABLE_INSERT
Type WCF-Custom
Filter - BTS.MessageType == http://Microsoft.LobServices.OracleDB/2007/03/HR/Table/EMPLOYEES#Delete

Change Binding properties
enableBizTalkCompatibilityMode = True
useAmbientTransaction = False

Select Instance


Response


Update Instance


Response


Insert Instance


Response


Delete Instance


Response

Friday, April 8, 2011

Invoke SQL Azure Stored Procedure (in Cloud) using BizTalk WCF-SQL Adapter

This is a hands on lab as how to call a stored procedure in SQL-Azure (in cloud).

If you want to do you will need a Windows Azure Account.

If you do than you can sign in through Azure Management Portal and if you do not have SQL Azure database you can go database in portal and click create a new SQL Database.


You will then go through set of steps (e.g. wizard), where you will have to select subscription and server, region (e.g. North Europe), credentials, firewall rules, database name, edition (web), and size (1 Gb).


So I now have a database in the cloud and I can access it through SQL management studio 2008 R2 on my machine. That’s what I thought, but I got the message below stating I need a firewall rule.


This meant I had to go back to the portal and create a firewall rule for IP address of my local machine or laptop. I dropped the database and started over again. And tried again and yes I could access the database instantly.


Now I needed to create a database with same tables and stored procedure as on-premise version. In SQL Azure you can create a new database by right clicking database and click new database. A script will appear that looks like below that needs to be executed.

CREATE DATABASE ADAPTER_SAMPLES;


This may take a few seconds, but then you have a database. Next step was to execute the script for creating table (just Employee) and stored procedure. I right clicked tables and then new table a new query screen appears where I execute following statements:

CREATE TABLE [dbo].[Employee](
[Employee_ID] [int] IDENTITY(10001,1) NOT NULL,
[Name] [varchar](50) NOT NULL,
[DOJ] [datetime] NULL,
[Designation] [varchar](50) NOT NULL,
[Job_Description] [varchar](max) NULL,
[Photo] [image] NULL,
[Salary] [decimal](18, 2) NOT NULL,
[Last_Modified] [timestamp] NULL,
[Status] [int] NULL CONSTRAINT [DF_Employee_Status] DEFAULT ((0)),
[Address] [xml] NULL,
CONSTRAINT [PK_Employee] PRIMARY KEY CLUSTERED
(
[Employee_ID] ASC
))
GO


Now of course I needed to have some data in there.

INSERT INTO [Employee]([Name],[Designation],[Salary])VALUES('Jeff Price','Manager',500000)
INSERT INTO [Employee]([Name],[Designation],[Salary])VALUES('Don Hall','Accountant',40000)
INSERT INTO [Employee]([Name],[Designation],[Salary])VALUES('Keith Harris','Supervisor',300000)
INSERT INTO [Employee]([Name],[Designation],[Salary])VALUES('Jim Hance','Admin',200000)
INSERT INTO [Employee]([Name],[Designation],[Salary])VALUES('Andy Jacobs','Accountant',400000)


And the stored procedure by navigate to stored-procedure and right click new new stored procedure. I deleted the preformatted stuff en pasted the code below:

CREATE PROCEDURE [dbo].[ADD_EMP_DETAILS]
-- Add the parameters for the stored procedure here
@emp_name varchar(50),
@emp_desig varchar(50),
@salary decimal(18,2)

AS
BEGIN
-- SET NOCOUNT ON added to prevent extra result sets from
-- interfering with SELECT statements.
SET NOCOUNT ON;
-- Insert statements for procedure here
INSERT INTO [ADAPTER_SAMPLES].[dbo].[Employee]
([Name]
,[Designation]
,[Salary])
VALUES
(@emp_name
,@emp_desig
,@salary)
SELECT [Employee_ID] FROM Employee where [Employee_ID] = (select IDENT_CURRENT('Employee'))

END
GO


Now that I have got things set up. I now go through same steps to invoke the stored-procedure in SQL Azure using WCF-SQL Adapter.

First I fire up VS2010 and create a new BizTalk project and then through add generated items I choose Consume Adapter Service.


I configured the URI accordingly and click Configure in security tab name of database administrator and then password, URI Properties the InitialCatalog Name and Server and you will get URI like:

mssql://kwtn4rghlk.database.windows.net//ADAPTER_SAMPLES?

Connect and category will appear. You will then select Procedure and add procedure and click OK.

Once that is done then binding and schema’s are generated.


After deploying I imported the binding file accompanied with this sample called WcfSendPort_SqlAdapterBinding_Custom.bindinginfo.xml. Send port will be created and only thing I had to do is adding filter to this send ports. If you go to generated send port and click configure for custom-adapter you will see in general tab and others the details.


One important thing to be noted here is that in binding the useAmbientTransaction has to be set to false! If not you will error message below


You will need to fill in credentials in credential tab! Next step is to add a filter for message type.


When this is done I created a receive location for incoming message that will look like this:


And a send port that will send response message to a folder. Message that will placed in receive folder is:


As a result to follow message is returned:


When I run the follow T-SQL command in SQL Azure I get the following result:


So as you can see I am in there now. I have showed you a way to invoke a stored procedure in SQL Azure using BizTalk Server with a messaging solution.